CALIBRATING
THE RECORDER
Factory
Calibration Information
The recorder is factory
calibrated during final assembly by calibrating the sensor (shipped with
the recorder) to known temperature and pH standards. This technique avoids
tracking and positioning errors due to temperature changes and mechanical
shock. However, if the pH readings drift or appear out of calibration,
follow Section 5.2 to recalibrate your recorder.
Changing Calibration Codes
To
change the calibration codes:
1. Open the control panel door (unlock it, if necessary).
2. Turn the power switch to the off (“O”) position.
3. Press and hold down the “SET” button while turning on the
power switch. This button is one of three Alarm buttons shown in Figure
4-5.
After you hear an audible beep, you will see the following display:
Then “CH”
appears on the display.
4. At this time,
release the “SET” button.
A 2-character temperature
calibration code "AC" should now appear in the display with the
first character blinking. Refer to Figure 5-2.
 Figure
5-1. First Display
|
 Figure
5-2
Temperature Code - First Character Blinking
|
5a. If the
first character is correct,
press the “SET” button and go to step 6.
5b. If the first character is not correct,
press the “HIGH” button to increase the value of the character
or the “LOW” button to decrease the value of the character. When
this character is correct, press the “SET” button.
6. The second character should now be blinking. Refer to Figure
5-3. If it is not, press the “SET” button until it does.
 Figure
5-3. Temperature Code - Second Character
Blinking
|
 Figure
5-4. Blinking Temperature Code
|
7a. If the
second character of the temperature calibration code is correct,
press the “SET” button and go to step 8.
7b. If the second character is not correct,
press the “HIGH” button to increase the value of the character or the
“LOW” button to decrease the value of the character. When this character
is correct, press the “SET” button.
8. A single character pH calibration code "6" should be
blinking in the display. Refer to Figure 5-4. If it is not, press the
“SET” button again.
9a. If the
temperature code is correct,
press the “SET” button and go to step 10.
9b. If the
temperature code is not correct,
press the “HIGH” button to increase the value of the character or the
“LOW” button to decrease the value of the character. When this character
is correct, press the “SET” button to lock in the values.
At this time, you see the temperature and pH codes on the display as you
entered them. This way, you can verify that you entered them correctly.
10. The unit
should now automatically go through the power up sequence as described
in Chapter 3. If it does not, hold down the “SET” button until it does.
While the unit goes through the power up sequence, observe the display
to see that the calibration values are what they should be and that they
have been entered correctly.
11. If either the temperature or pH code is incorrect,
repeat steps 1-10. After you are all done with the changes, lock the control
panel door, if necessary. Refer to Section 4.3 for details.
Calibrating
pH Readings
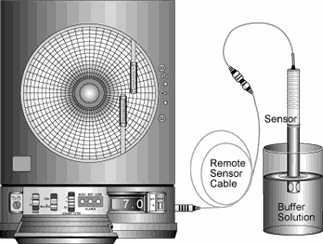
 Figure
5-5. Calibration Setup
|
In order to calibrate
the pH readings you need 7.00 and 4.00 buffer solutions. Start by turning
the unit ON and observing the Display power up routine. After you hear
a beep, you will see the display "LO BAT.-188", than the temperature code
"Ac", followed by pH code "6".
Put the display switch on pH.
Immerse the sensor in 7.00 buffer solution like in figure 5-5. then wait
one minute for the pens to stop moving. Observe the display: it should
read 7.0. If it does not, turn the calibration switch to "CAL" and open
the door.
When the pens stop moving, turn the "CAL" adjustment to display 7.0, than
put the sensor in 4.00 buffer solution and wait one minute. If the display
doesn't read 4.0, turn the "Slope" adjustment to bring it to 4.0.
Repeat these steps until the readings are correct in both 7.00 and 4.00
buffer solutions. Now the recorder is calibrated.
Close the door and put the calibration switch on "NORMAL".
|